How To Make A Spawning Mop For Goldfish Breeding
If you want to breed with goldfish, I recommend incorporating a spawning mop. A spawning mop uses yarn to imitate live plants for your fish eggs to stick to during spawning. It is straightforward, and I will discuss all the benefits of spawning a mop while breeding goldfish. A spawning mop is mainly used for egg and live-bearing fish like Guppies to hide in.
You get different types of yarn, like synthetic, polyester, and acrylic. Synthetic polyester yarn doesn’t readily absorb liquids and isn’t what I recommend. I prefer using 100% acrylic yarn, as I want to ensure the natural fibers or artificial dyes of the yarn don’t start decomposing in the water and harm my fish. I limit the release of anything unwanted by leaving my newly created spawning mop in boiling water before use.
What You Need To Make A Spawning Mop

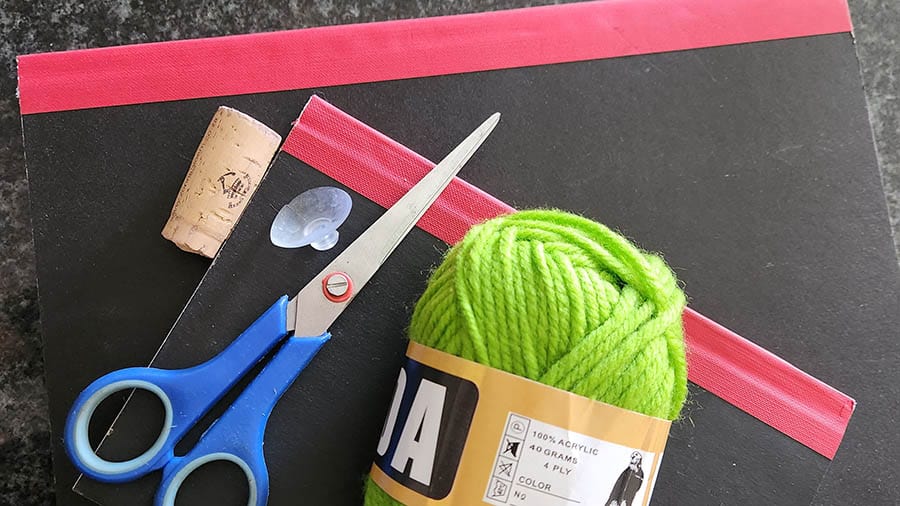
- 100% Acrylic yarn (the color is up to you, I prefer green)
- Scissors
- A Book (roughly the length of your required spawning mop)
- Optional: cork or something buoyant (I used a wine cork if you want to make a floating mop)
- Optional: Silicone suction cups (if you wish to suction your mop to the side of the tank)
If you want to make a floating spawning mop, please do not use Polystyrene or Styrofoam, as they can break and release particles your fish will eat. Instead, use a wine cork or bubble wrap bunched together or cut a piece off your pool noodle. You can also stick the mop to the side of the tank, but make sure not to use a rigid metal or plastic clip that could hurt your fish.
How To Make A Spawning Mop (Floating Mop, Bottom Mop, Or Side Mop)

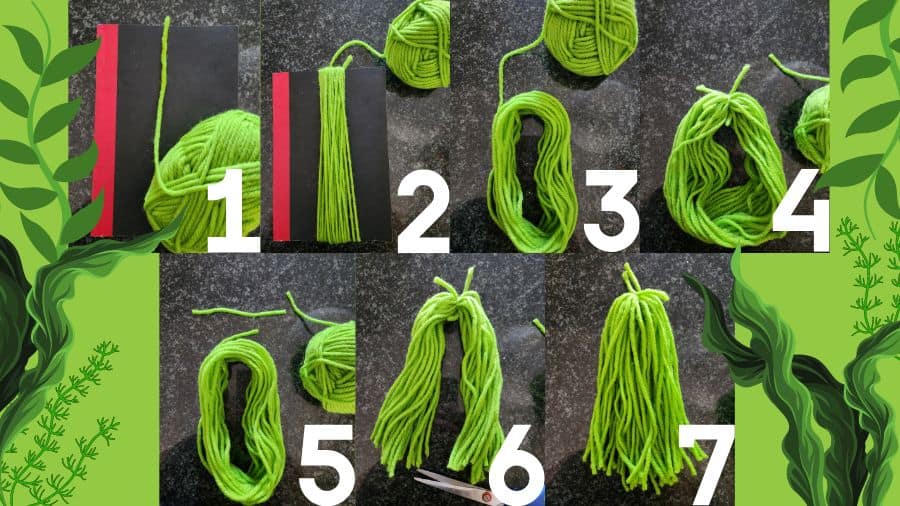
First, you need to choose the length of the mop you require. I used a medium-sized book as I needed about that length of mop. You can use a longer book if you need a longer mop length. The nice thing about the yarn mop is that you can always trim it to your desired length afterward. You can now place your yarn over the book in the direction you will be going around in.
Step two: You will now wrap your yarn around the chosen length of the book. In the picture above, I wrapped the yarn around 30 times. You can do up to 50 wraps if you require a denser mop.
Steps three through five: I then remove the wrapped yarn from the book and cut it from the rest of the yarn. I cut an additional piece of yarn to tie the top section together. Making a tight double knot is best, as the yarn quickly pulls apart if not tied together correctly.
Steps six—seven: Now you can cut the loop on the opposite end that you tied it. Presto, your basic spawning mop is complete. You can trim the ends to make them even or cut them to your required length. I usually boil water in a kettle, drop my newly made mop into a container, and add the boiling water for it to soak in the boiling water. Once the water has cooled down, you can squeeze the mop a few times in the water, and it will be all set to add to your tank.
The Various Spawning Mop Options

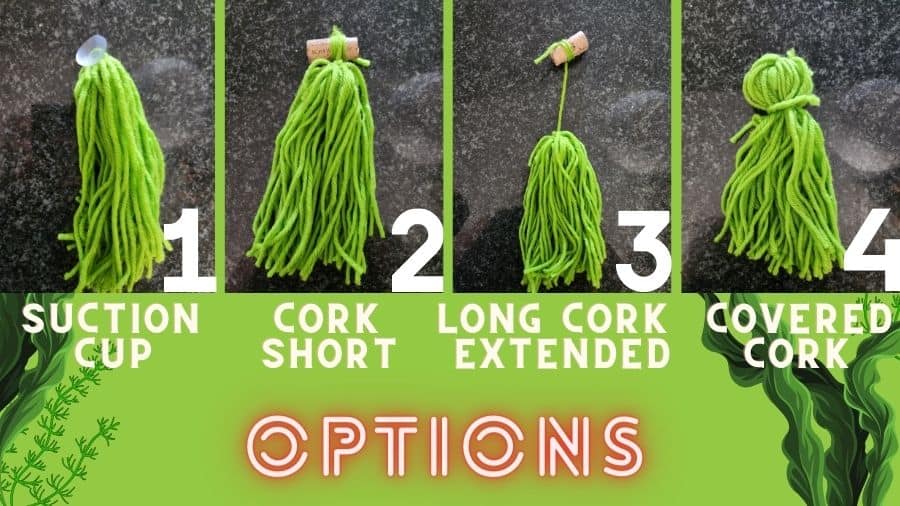
The suction cup mop would anchor your spawning mop to the side of the tank. You can cut off an additional piece of yarn to secure the suction cup to your newly made spawning mop.
The short exposed cork mop is a simple way to keep your spawning mop floating. Ensure you securely anchor the cork or whatever you use to the mop; things sometimes get rough during spawning.
The long/extended cork mop is perfect for when you want your mop to sit in the middle of the water. If you don’t have a tank lid, it would prevent your fish from jumping out of the tank.
The covered cork mop hides the cork nicely, and I prefer the look of this option. You can achieve this by adding your cork under the mop and then tying an additional piece of yarn under the cork to secure it to the spawning mop.
Another option is the bottom-laying spawning mop. You can add the basic mop to the tank, which will lay on your substrate. This is an excellent option for goldfish, as they tend to move along the bottom when spawning.
