
How to Culture Tubifex Worms
Build and maintain a separate recirculating Tubifex culture, feed it lightly, harvest cleanly, and reduce the risk of transferring pathogens to fish.
How to culture Tubifex worms safely begins with the source. Use worms from a clean, closed culture that has not been exposed to wild water, fish waste, or sick livestock. Keep the culture separate from every aquarium and never pour its water or substrate into a fish tank.
Live tubificid worms can carry fish pathogens. Fish-facility biosecurity guidance lists them as a possible disease vector, and researchers have detected fish-parasite stages in imported live oligochaetes. Home culture lowers exposure only when the starter and incoming water are controlled. It cannot prove that worms are pathogen-free.
Keep The Culture Separate From Your Fish
- Buy starter worms from a trusted captive culture, not a drain, pond, or unknown live-food shipment.
- Use dedicated containers, nets, hoses, and tools that never return to an aquarium.
- Keep clean, moving, dechlorinated water and feed lightly so waste does not build up.
- Discard a culture that smells foul, suffers a sudden die-off, or may have contacted sick fish.
- Harvest only the worms, rinse them in clean dechlorinated water, and feed a small amount as part of a varied diet.
What Tubifex Worms Are
Tubifex worms are thin, reddish aquatic oligochaetes. The Missouri Department of Conservation notes that tubificids live in silt and decaying organic matter and can tolerate low oxygen. In the hobby they are sold as live or freeze-dried fish food. Live worms from wild or unknown sources can carry pathogens, so keep a closed culture and rinse harvests in clean water.
Setting Up The Culture Bin
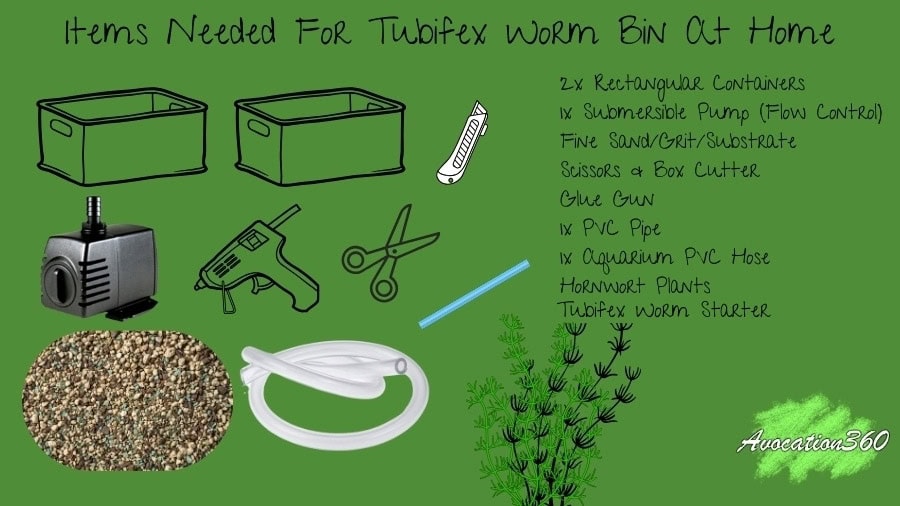
When choosing a spot at home for your worms, it’s best to pick one relatively close to water and electrical points to ensure your pump can easily be plugged in and water changes aren’t a headache.
The rectangular containers can hold 15 to 25 liters (4 to 7 gallons), depending on your available space. Choose containers that can be easily stacked on top of each other. The container at the bottom will contain the water, pump, and plants, while the top container will contain the overflow, substrate, worms, and water.
Choose a submersible water pump that will allow you to adjust the water flow. You don’t require a heavy flow; you mainly need water agitation. You will combine the pump with the corresponding size aquarium PVC hose, so get the size hose that goes with your water pump.
You can choose any fine-grit sand or substrate you can find; make sure you get enough to cover the area of the container inside at a height of approximately an inch (3CM), as the worms will move into the grit after day one. The sand/substrate must be rinsed before being added to the top container.
Scissors might come in handy when cutting the hose or plants, but you will need something like a box cutter to make the hole in the top container large enough to fit the PVC pipe through.
You can use a glue gun to seal off and secure the PVC pipe to the container. Some also use epoxy or silicone; it is up to you. As long as the PVC pipe is secure and the container is waterproof, this will work great.
The PVC pipe you choose can be one you have lying around at home; the length of the PVC pipe will depend on the depth of your container. You have to position the pipe so that it is lower than the top of the container so the water can go into the pipe and act as an overflow, guiding the surface water to the bottom container.
As mentioned earlier, your Aquarium PVC hose must be the size your water pump requires and long enough to pump water into the top container from the bottom container where the pump is located. This hose will feed the worms their water from the bottom.
Hornwort plants are a great addition to the water in the bottom container as they help add additional filtration and contribute to the general habitat of the Tubifex worms.
DIY Bin Build
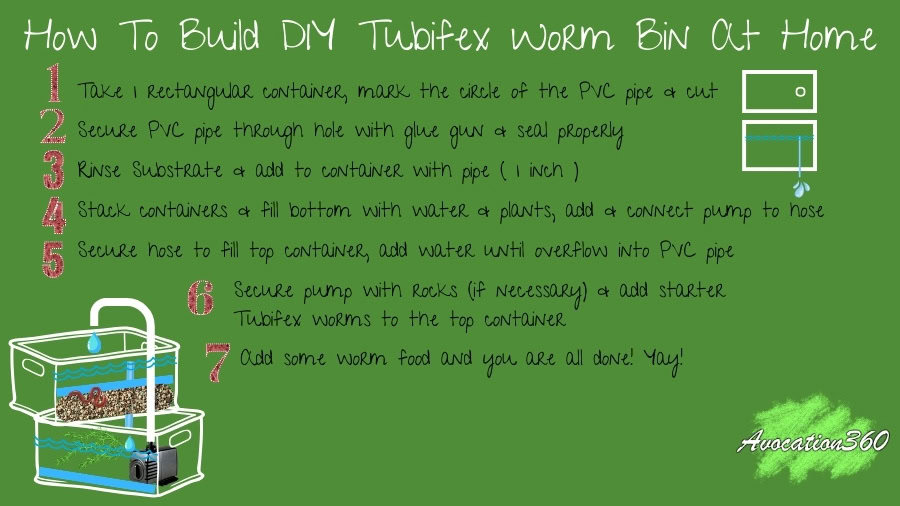
Above, I tried to illustrate how the bin/tank setup is supposed to look; the top container will be sitting horizontally over the bottom container. From the front view, it should look like a capital “T,” if that helps.
- Step one is getting the hole into the top container. The position should be to the left or right side of the bottom of the container. See the picture above (top right) as an illustration.
- Step two is securing and sealing the PVC pipe to the top container to create the overflow pipe. As mentioned, this pipe should be lower than the top of the container to ensure that your pipe will end at the water level and extend a bit from the bottom.
- In step three, you will rinse your chosen substrate to remove any excess debris and contaminants. After rinsing, you can stack your containers so the container with the PVC pipe is at the top and add the substrate to that top container. Ensure your substrate is about an inch (3CM) thick in the container, as the worms will migrate into it.
- In step four, you can fill your bottom container with water, add dechlorination drops or prime to remove chlorine and connect the submersible pump with the silicone pipe. You can also add the plants to the bottom container now, and if necessary, secure the submersible pump with some rocks.
- In step five, you can now guide your silicone pipe to the top container so the water runs into it. Keep filling the bottom container with water until the overflow pipe starts working.
- Steps six and seven involve adding your starter Tubifex worms to the top container and providing them with food.
What To Feed Them
Tubifex worms are easy to feed and keep happy. You can add fish flakes every second or third day, spirulina powder (as an extra supplement), and sinking pellets. You will notice that either the flakes or the sinking pellets work better for you; unfortunately, it is a bit of trial and error.
How to Keep Tubifex Worms Alive
To keep a Tubifex worm culture alive, focus on clean, moving water and light feeding. Keep the bin out of direct sun, use dechlorinated water, and make sure the pump keeps the surface moving so the worms have enough oxygen. Feed a small pinch of flakes or one sinking pellet every two to three days, then remove any uneaten food before it fouls the water. If the water starts to smell bad or look cloudy, do a partial water change and reduce the amount of food you are adding.
Water for Tubifex Worms
Use dechlorinated water and keep it moving. A small pump should agitate the surface so oxygen stays available. Keep the bin out of direct sun so the water does not overheat. A home bin does not need lab gear, but stagnant water will fail. Change part of the water if it turns cloudy. Never dump culture water into a fish tank.
A culture study in the North American Journal of Aquaculture found good growth on commercial flake or spirulina sinking feeds across a wide temperature range. Cooler water can still work, but still keep the water moving.
Smell in a Tubifex Culture
A mild earthy smell can happen in a working bin. A strong rotten smell means waste has built up. Stop feeding, remove uneaten food, and do a partial water change with dechlorinated water. If the smell stays, or you see a sudden die-off, discard the whole culture. Do not try to save foul worms by rinsing them into an aquarium.
How To Harvest A Batch
After the worms move into the substrate, scoop a small section into a dedicated fine net. Separate the worms from the grit, then rinse them several times in a clean container of dechlorinated water. Do not rinse them with recirculating culture water.
Move the rinsed worms into a clean feeding cup with no culture water or substrate. Feed only what the fish can finish promptly, remove uneaten worms, and wash the dedicated harvest tools before returning them to the culture area. Rinsing removes debris, but it does not guarantee that live food is free of pathogens.

Home fish breeder sharing practical aquarium, egg-care, and fry-raising methods.
Related guides

How to Make Green Water Culture for Fish Fry
Start a separate green-water culture with dechlorinated water, steady light, gentle aeration, and measured nutrients, then harvest it safely for fry.
How to Make a Snello Recipe
I make Snello as a soft supplemental food for aquarium snails. Here is a simple vegetable mix, safe ingredient guidance, and clear freezing and feeding steps.
My Betta Fish Laid Eggs: What to Do
Use these first steps after an accidental Betta spawn to separate the adults, protect the fry, prepare tiny foods, and keep the water stable.